Pi-hole Group Madness
If you been using the wonderful Pi-hole DNS, and adding your domains to groups to organize them, because why not, right? But, only to find out that those domain rules aren’t being honoured. The thing is this is by design.
If you been using the wonderful Pi-hole DNS, and adding your domains to groups to organize them, because why not, right? But, only to find out that those domain rules aren’t being honoured. The thing is this is by design.
Manage crypto keys can be a burden, making sure they don’t get stolen, lost, or having them backed up for when you need to setup that shiny new laptop that you now have because your old one died. With this SSH agent feature, you can now store your SSH keys in your Bitwarden vault.
To learn how to configure the Bitwarden SSH agent for your platform.
If you use Bitwarden from the macOS store.
export SSH_AUTH_SOCK=~/Library/Containers/com.bitwarden.desktop/Data/.bitwarden-ssh-agent.sock
If you use the Disk Image or Brew version.
export SSH_AUTH_SOCK=~/.bitwarden-ssh-agent.sock
Set the variable accordingly. Then enable the SSH agent feature.
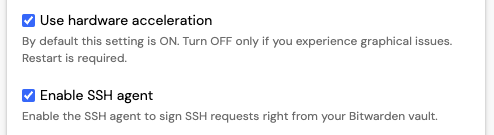
With the release of Bitwarden 2025.1.2 or newer, comes with built-in SSH agent feature. The feature is off by defaullt, so it’s opt-in. To enable the SSH agent feature, navigate to Settings and Enable SSH agent.
If you have gone through the process of setting up DNS-based security for your home (Pi-Hole) or enterprise (Defender for DNS) network that’s awesome, you have increased the security of that network.
If done right this will give you the visibility to see what is happening and control what’s going on with your network with clients that use internal DNS. If you have not take the time to identify, update, and block clients from using external DNS servers, you have a gap in your DNS security.
If you would like to capture traffic from the wireless interface of an iPhone. You will need the following:
rvctlPlug the iPhone into a macOS computer using a USB to Lightning cable. Run Xcode, and access the Device and Simulators window through the menubar Window > Device and Simulators or by using the keyboard short ⇧⌘2.