Troubleshooting VMware ESXi iSCSI Connections from CLI
Troubleshooting iSCSI connections… we have all been there, at the data center or your desk trying to solve some dead path issue. I like to drop back to the CLI for this task as it’s much easier to get the information out of VMware for troubleshooting purposes, and the Web clients don’t always have the most current information, without requiring a refresh.
First, let’s get a physical layout of the land we are dealing with on this host.
[root@esxi:~] esxcfg-nics -l
Name    PCI          Driver      Link Speed     Duplex MAC Address       MTU
vmnic0  0000:01:00.0 tg3         Up   1000Mbps  Full   b8:2a:72:dc:2d:e8 1500
vmnic1  0000:01:00.1 tg3         Up   1000Mbps  Full   b8:2a:72:dc:2d:e9 1500
vmnic2  0000:02:00.0 tg3         Up   1000Mbps  Full   b8:2a:72:dc:2d:ea 9000
vmnic3  0000:02:00.1 tg3         Up   1000Mbps  Full   b8:2a:72:dc:2d:eb 9000
vmnic4  0000:05:00.0 tg3         Up   1000Mbps  Full   00:0a:f7:64:54:9c 1500
vmnic5  0000:05:00.1 tg3         Up   1000Mbps  Full   00:0a:f7:64:54:9d 1500
vmnic6  0000:05:00.2 tg3         Up   1000Mbps  Full   00:0a:f7:64:54:9e 9000
vmnic7  0000:05:00.3 tg3         Up   1000Mbps  Full   00:0a:f7:64:54:9f 9000
[root@esxi:~]
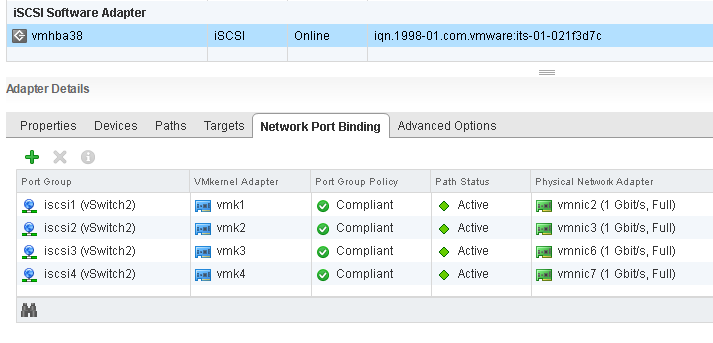
Note the physical adapters that are dedicated to iSCSI on this host are vmnic2, vmnic3, vmnic6, and vmnic7. The physical iSCSI adapters are split between the onboard NIC and a card. Notice the iSCSI vmnics are set with an MTU of 9000.
[root@esxi:~] esxcfg-vmknic -l
Interface  Label        IP Address        Netmask         Broadcast      MTU
vmk0       Mgmt Network 192.168.21.91     255.255.255.0   192.168.21.255 1500
vmk1       iscsi1       192.168.23.112    255.255.255.0   192.168.23.255 9000
vmk2       iscsi2       192.168.23.113    255.255.255.0   192.168.23.255 9000
vmk3       iscsi3       192.168.23.114    255.255.255.0   192.168.23.255 9000
vmk4       iscsi4       192.168.23.115    255.255.255.0   192.168.23.255 9000
Note: The output from the above command was edited for brevity, removing information that would be meaningless in this context.
If you are having trouble with a specific VMK adapter / IP Address, you can validate that there is indeed a problem with this adapter using vmkping command. Attempt to ping an address that the problematic VMK should be able to reach using the option -I to indicate which VMK adapter to send packets out. For example:
[root@esxi:~] vmkping -I vmk3 192.168.23.115
PING 192.168.23.115 (192.168.23.115): 56 data bytes
64 bytes from 192.168.23.115: icmp_seq=0 ttl=64 time=0.340 ms
64 bytes from 192.168.23.115: icmp_seq=1 ttl=64 time=0.138 ms
64 bytes from 192.168.23.115: icmp_seq=2 ttl=64 time=0.177 ms

--- 192.168.253.115 ping statistics ---
3 packets transmitted, 3 packets received, 0% packet loss
round-trip min/avg/max = 0.138/0.218/0.340 ms
For VMK adapters that fail to reach the address, I would go back and verify the VMK adapter configuration, port group settings, and physical switch port configuration for as they can all stop the iSCSI from working. Adapters and switch ports should be able to pass frames above 9000 bytes. To test this you can use the vmkping option -s to specify the ping size.
[root@esxi:~] vmkping -s 9216 -I vmk3 192.168.23.115
If you fail to receive a response you might not have the entire iSCSI connection chainset with an MTU of 9000 or greater. Verify the VMK adapter settings, virtual switch this VMK is associated with, also check the physical switch port settings.