Reset and Setup Dell EqualLogic Array
I recently had to reset and set up a Dell EqualLogic PS4000 SAN array. At the same time, I decided to upgrade the firmware on the array, before placing it back into production. This a rough transcript and comments of that process.
PS Series Storage Arrays
Unauthorized Access Prohibited

login: grpadmin
Password:


           Welcome to Group Manager

        Copyright 2001-2012 Dell, Inc.


grp> 631:5:netmgtd:12-Jul-2016 09:10:12.270006:rcc_util.c:753:INFO::25.2.9:CLI: Login to account grpadmin succeeded, using local authentication. User privilege is group-admin.
grp> show grpparams
______________________________ Group Information ______________________________
Name: grp                              Group-Ipaddress: 192.168.200.12
Group-Mgt-Gateway:                     Def-Snap-Reserve: 100%
Def-Snap-Warn: 10%                     Def-Snap-Depletion: delete-oldest
Def-Thin-Growth-Warn: 60%              Def-Thin-Growth-Max: 100%
DateAndTime: Tue Jul 12 09:10:37 2016  TimeZone: America/New_York
Description:                           Def-Iscsi-Prefix:
Def-Iscsi-Alias: yes                     iqn.2001-05.com.equallogic
Info-Messages: enabled                 Webaccess: enabled
Webaccess-noencrypt: enabled           Cliaccess-SSH: enabled
Cliaccess-Telnet: enabled              Email-Notify: enabled
Syslog-Notify: enabled                 iSNS-Server-List:
Email-List:                            NtpServers:
Smtp-Server-List:                      DNS-Server-List:
DNS-Suffix-List:                       Syslog-Server-List:
Target-Auth-UserName:                  Target-Auth-Password:
Email-From: [email protected]
Location:                              Conn-Balancing: enabled
Discovery-Use-Chap: enabled            Email-Contact:
Perf-balancing: enabled                Disallow-Downgrades: no
Management-Ipaddress:                  SSH-V1-Protocol: enabled
FTP-service: enabled                   Standby-Button: disabled
DCB: enabled                           Def-DCB-VLAN-Id: 0
Thermal-Shutdown: enabled              Crypto-Legacy-Protocols: enabled
_______________________________________________________________________________
_____________________________ Radius Information ______________________________
radius-auth-list:                      login-radius-auth: disabled
radius-auth-retries: 1                 radius-auth-timeout:  2secs
login-radius-acct: disabled            radius-acct-retries: 1
radius-acct-timeout:  2secs            iscsi-radius-auth: disabled
iscsi-local-auth: enabled              radius-acct-list:
login-radius-attr: enabled
_______________________________________________________________________________
______________________________ Snmp Information _______________________________
read-only-comms:                       read-write-comms:
trap-community:                        snmp-managers:
_______________________________________________________________________________
grp> member show
Name       Status  Version           Disks Capacity   FreeSpace  Connections
---------- ------- ----------        ----- ---------- ---------- -----------
grp01      online  V5.2.1 (R2 19658) 16    5.1TB      1.12TB     0

grp> member select grp01
grp(member_grp01)> show eths
Name ifType          ifSpeed    Mtu  Ipaddress                     Status Errors DCB
---- --------------- ---------- ---- ----------------------------- ------ ------ ------
eth0 ethernet-csmacd 1 Gbps     9000 192.168.200.4                 up     0      off
eth1 ethernet-csmacd 1 Gbps     9000 192.168.200.5                 up     0      off
eth2 ethernet-csmacd 10 Mbps    1500 172.16.0.230                  down   0      off
grp(member_grp01)> exit
Trying to run setup on an array that is already setup, results in an error message.
grp> setup

                Group Manager Setup Utility


The storage array is already configured. If you want to
reconfigure the array, you must first run the reset command to reset
the array to its factory defaults.  After running the reset command,
invoke setup to reconfigure the array.

Note: The reset command will completely initialize the array and
remove any configuration and user data on array.

grp> reset

Warning: This command resets an array to the factory
defaults (original condition).  The result is the
elimination of all group and volume configuration
information and any volume data residing on the array.

Before resetting an array that is a member of a group,
it is recommended that you delete the member from the
group.

Reset this array to factory defaults? [n/DeleteAllMyDataNow] DeleteAllMyDataNow
Resetting system, this will take a few minutes.
Deleting backup password files
Deleting agent.cnf
Cleaning-up /pss/dumps/
Zeroing drives, nvram and rebooting the system


#########################################################
#                                                       #
#          Dell (tm), Inc. Storage Array                #
#               Copyright 2001-2008                     #
#    70-0120 Rev=R10 SN=RMS833080003A56 ECO=C00         #
#                                                       #
#########################################################
            -- Type Ctrl-p key to enter setup mode --

BOOTROM version 8.1.1
Build Date: Thu Feb 26 02:33:58 EST 2009
Total memory: 0x80000000 bytes (2048MB)
NP Loading ...Done
SP Loading ...Done

Dell, Inc. Storage Array

Copyright 2001-2012 Dell, Inc.

SP:2.78:mips_pss_init.c:411:INFO:28.2.107:Control module in slot 0 with serial number X is designated as active.
MFS set up
Building databases...
SP:1468330161.10:emm.c:1276:INFO:28.2.6:Enclosure serial number: X.
Tue Jul 12 09:29:25 EDT 2016
Jul 12 09:29:25 init: kernel security level changed from 0 to 1
SP:1468330167.16:emm.c:2380:INFO:28.2.30:Control modules have completed initializing, and failover is now operational.

Login to set up the reset array.
PS Series Storage Arrays
Unauthorized Access Prohibited


login: grpadmin
Password:


           Welcome to Group Manager

        Copyright 2001-2012 Dell, Inc.


netmgtd:1468330201.06:rcc_util.c:753:INFO:25.2.9:CLI: Login to account grpadmin succeeded, using local authentication. User privilege is group-admin.
netmgtd:1468330201.07:rcc_util.c:759:AUDIT:25.7.0:CLI: Login to account grpadmin succeeded, using local authentication. User privilege is group-admin.

It appears that the storage array has not been configured.
Would you like to configure the array now ? (y/n) [n]y


                Group Manager Setup Utility


 The setup utility establishes the initial network and storage
 configuration for a storage array and then configures the array
 as a member of a new or existing group of arrays.

    For help, enter a question mark (?) at a prompt.


   The battery is not completely charged. It is recommended that
   you wait until the battery is completely charged before running setup.

   Do you want to proceed (yes | no ) [no]: yes

 Initializing.  This may take several minutes to complete..

 Enter the network configuration for the array.

   Member name []: jc-grp-01
   Network interface [eth0]:
   IP address for network interface []: 192.168.26.30
446:175:SP:12-Jul-2016 09:31:39.800176:verify.c:843:INFO::14.2.12:0:Parity verification initiated on RAID LUN 0.
447:176:SP:12-Jul-2016 09:31:39.800177:verify.c:843:INFO::14.2.12:0:Parity verification initiated on RAID LUN 0.
448:177:SP:12-Jul-2016 09:31:39.800178:verify.c:843:INFO::14.2.12:0:Parity verification initiated on RAID LUN 0.
449:178:SP:12-Jul-2016 09:31:39.800179:verify.c:843:INFO::14.2.12:0:Parity verification initiated on RAID LUN 0.
450:179:SP:12-Jul-2016 09:31:39.800180:verify.c:843:INFO::14.2.12:0:Parity verification initiated on RAID LUN 0.
451:180:SP:12-Jul-2016 09:31:39.800181:verify.c:843:INFO::14.2.12:0:Parity verification initiated on RAID LUN 0.
452:181:SP:12-Jul-2016 09:31:39.800182:verify.c:843:INFO::14.2.12:0:Parity verification initiated on RAID LUN 0.
459:182:SP:12-Jul-2016 09:31:48.910183:verify.c:370:INFO::13.2.7:Parity verification completed.
29
   Netmask [255.255.255.0]:
   Default gateway [192.168.26.1]:

 Initializing interface eth0.  This may take a minute.....
At this point you could join an existing group, or create a new group, here we create a new group.
Enter the IP address and name of the group that the array will join.

   Group name []: jc-grp
   Group IP address []: 192.168.26.12

 Searching to see if the group exists.  This may take a few minutes.


 The group does not exist or currently cannot be reached. Make sure
 you have entered the correct group IP address and group name.

   Do you want to create a new group (yes | no) [yes]: yes

       Group Configuration

  Group Name:                     jc-grp
  Group IP address:               192.168.26.12

   Do you want to use the group settings shown above (yes | no) [yes]: yes
   Password for managing group membership:
   Retype password for verification:

   Password for the default group administration(grpadmin) account:
   Retype password for verification:


 Saving the configuration...

 Waiting for configuration to become active...Done
600:14:psgd:12-Jul-2016 09:33:59.480015:psgd_group.cc:17393:INFO::18.2.0:Group member jc-grp-01 now active in the group.

 Group jc-grp-01 has been created with one member.
 Use the Group Manager GUI or CLI to set the RAID policy
 for the member.  You can then create a volume which
 a host can connect to using an iSCSI initiator.


 To access the Group Manager GUI, specify http://group_ip_address in
 a Web browser window.  To access the CLI, use telnet or SSH to
 connect to the group IP address from a remote terminal, or attach a
 console terminal directly to a serial port on a group member's
 active control module.  Log in to the default group administration
 account (grpadmin) using the password you specified when creating
 this group. See the Group Administration manual for more
 information.
Verify group configuration before continuing.
jc-grp-01> show grpparams
______________________________ Group Information ______________________________
Name: jc-grp                           Group-Ipaddress: 192.168.26.12
Def-Snap-Reserve: 100%                 Def-Snap-Warn: 10%
Def-Snap-Depletion: delete-oldest      Def-Thin-Growth-Warn: 60%
Def-Thin-Growth-Max: 100%              DateAndTime: Tue Jul 12 09:34:15 2016
TimeZone: America/New_York             Description:
Def-Iscsi-Prefix:                      Def-Iscsi-Alias: yes
  iqn.2001-05.com.equallogic           Info-Messages: enabled
Webaccess: enabled                     Webaccess-noencrypt: enabled
Cliaccess-SSH: enabled                 Cliaccess-Telnet: enabled
Email-Notify: disabled                 Syslog-Notify: disabled
iSNS-Server-List:                      Email-List:
NtpServers:                            Smtp-Server-List:
DNS-Server-List:                       DNS-Suffix-List:
Syslog-Server-List:                    Target-Auth-UserName:
Target-Auth-Password:                  Email-From:
Location: default                      Conn-Balancing: enabled
Discovery-Use-Chap: disabled           Email-Contact:
Perf-balancing: enabled                Disallow-Downgrades: yes
Management-Ipaddress:                  SSH-V1-Protocol: enabled
FTP-service: enabled                   Standby-Button: disabled
DCB: enabled                           Def-DCB-VLAN-Id: 0
Thermal-Shutdown: enabled              Crypto-Legacy-Protocols: enabled
_______________________________________________________________________________
_____________________________ Radius Information ______________________________
radius-auth-list:                      login-radius-auth: disabled
radius-auth-retries: 1                 radius-auth-timeout:  2secs
login-radius-acct: disabled            radius-acct-retries: 1
radius-acct-timeout:  2secs            iscsi-radius-auth: disabled
iscsi-local-auth: enabled              radius-acct-list:
login-radius-attr: enabled
_______________________________________________________________________________
______________________________ Snmp Information _______________________________
read-only-comms:                       read-write-comms:
trap-community: SNMP-trap              snmp-managers:
_______________________________________________________________________________
jc-grp> show member
Name       Status  Version           Disks Capacity   FreeSpace  Connections
---------- ------- ----------        ----- ---------- ---------- -----------
jc-grp-01  online  V5.2.1 (R2 19658) 16    0MB        0MB        0
jc-grp> member select jc-grp-01
jc-grp(member_jc-grp-01)> show eths
Name ifType          ifSpeed    Mtu  Ipaddress                     Status Errors DCB
---- --------------- ---------- ---- ----------------------------- ------ ------ ------
eth0 ethernet-csmacd 1 Gbps     9000 192.168.26.29                 up     0      off
eth1 ethernet-csmacd 10 Mbps    1500                               down   0      off
eth2 ethernet-csmacd 10 Mbps    1500                               down   0      off
jc-grp(member_jc-grp-01)> eth select 1
jc-grp(member_jc-grp-01 eth_1)> ipaddress 192.168.26.30 netmask 255.255.255.0
jc-grp(member_jc-grp-01 eth_1)> up
jc-grp(member_jc-grp-01 eth_1)> exit
jc-grp(member_jc-grp-01)> show eths
Name ifType          ifSpeed    Mtu  Ipaddress                     Status Errors DCB
---- --------------- ---------- ---- ----------------------------- ------ ------ ------
eth0 ethernet-csmacd 1 Gbps     9000 192.168.26.29                 up     0      off
eth1 ethernet-csmacd 10 Mbps    1500 192.168.26.30                 down   0      off
eth2 ethernet-csmacd 10 Mbps    1500                               down   0      off
jc-grp(member_jc-grp-01)> eth select 2
jc-grp(member_jc-grp-01 eth_2)> ipaddress 192.168.20.92 netmask 255.255.255.0
jc-grp(member_jc-grp-01 eth_2)> up
This port is for group management only. Make sure it is connected to a dedicated management network.
Do you want to enable the management interface? (y/n) [n]y

jc-grp(member_jc-grp-01 eth_2)> exit
jc-grp(member_jc-grp-01)> show eths
Name ifType          ifSpeed    Mtu  Ipaddress                     Status Errors DCB
---- --------------- ---------- ---- ----------------------------- ------ ------ ------
eth0 ethernet-csmacd 1 Gbps     9000 192.168.26.29                  up    0      off
eth1 ethernet-csmacd 1 Gbps     9000 192.168.26.30                  up    0      off
eth2 ethernet-csmacd 100 Mbps   1500 192.168.20.92                  up    0      off
jc-grp(member_jc-grp-01 eth_2)> exit
jc-grp(member_jc-grp-01)>
This array was running a 5.2.x series firmware, so I took the opportunity to update the firmware to the latest 7.1.x stable firmware. To do this I had to update to a 6.0.x series firmware in the interim, direct upgrade path from 5.2.x to 7.1.x was not possible on the array I was updating. Due to the array not being initialized, I had to restart the array via CLI.
1320:0:jc-grp-01:logevent:12-Jul-2016 11:22:21.260001:logevent.cc:259:ERROR:30.4.1:Array firmware update from version V5.2.1 to V6.0.11 failed. Reason: The array cannot be restarted using the GUI because of a RAID issue. Use the CLI 'restart' command to continue.

jc-grp> restart

There is new firmware in the update area.

As part of applying the new firmware, the active and secondary control
modules will switch roles.  Therefore, the current active control module
will become the secondary after the firmware is applied.

Would you like to load the firmware now? (yes/no) [no] yes

602:0:jc-grp-01:logevent [secondary]:12-Jul-2016 11:28:02.570001:logevent.cc:259:INFO:30.2.8:Completed firmware update from V5.2.1 to V6.0.11 on controller in slot 0, serial number X.

603:0:jc-grp-01:reboot [secondary]:12-Jul-2016 11:28:06.020001:reboot.cc:247:INFO:30.2.1:Restarting secondary control module with options ''.
Next update firmware to 7.2.x series firmware
jc-grp>
1077:0:jc-grp-01:logevent:12-Jul-2016 11:36:13.400001:logevent.cc:259:INFO:30.2.5:Starting copy of firmware V7.1.12 to the compact flash.
jc-grp>
1122:0:jc-grp-01:logevent:12-Jul-2016 11:53:37.070001:logevent.cc:259:INFO:30.2.6:Completed copy of firmware V7.1.12 to the compact flash.
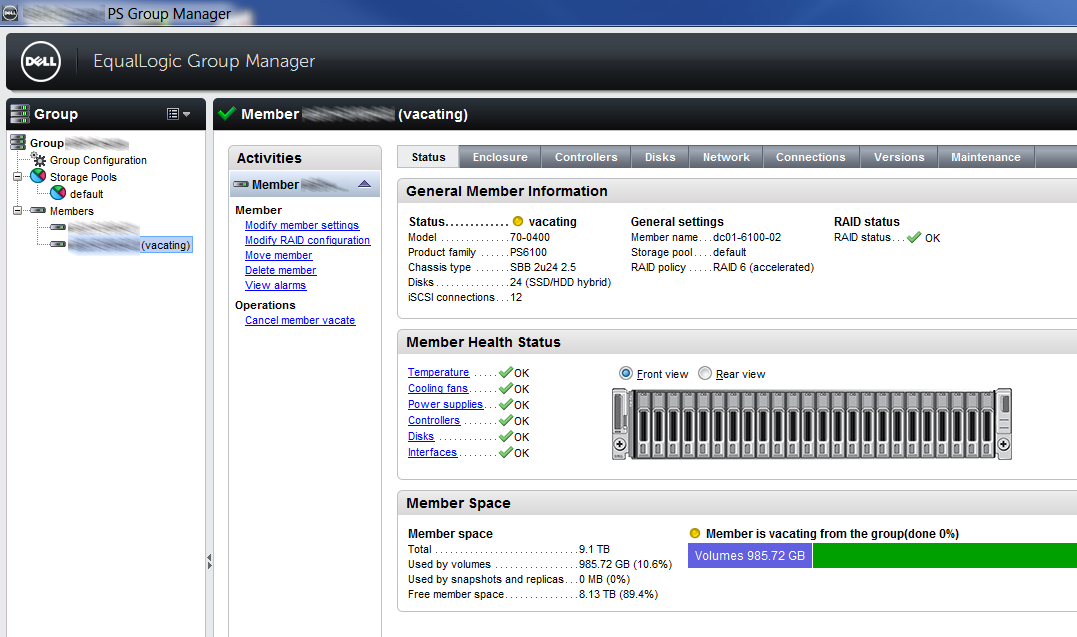
There it is, reset, setup and firmware updated, ready for initialization. You can initialize the RAID policy from the Group Manager using the management address of the member from a compatible web browser.